Showing posts with label Advanced Servers. Show all posts

How To Access Web Server Through IP Address?

0 comments

How to access web server through ip address(not the default site)?

Step1 : check for the package installed or not

#rpm -qa | grep httpd

Step2 : Install the package

#yum install httpd

Step3 : Create the root web directory and a test index.html for this testing.

I want to create my web directory in /ipbasehost

#mkdir /ipbasehost

Now create index.html and try to write something in to that file then save the file.

#vi /ipbasehost/index.html

save and exit the file.

Step4 : Now edit the httpd.config file

#vi /etc/httpd/conf/httpd.conf

Go to last line and write the below content

DocumentRoot /ipbasehost/
DirectoryIndex index.html

Save the file and exit.

Let me explain above four lines

=> This indicates we are creating a virtualhost who's IP addresse is 192.168.0.1

DocumentRoot /ipbasehost/ => This indicates where is my document root i.e., all my web content should be placed under /ipbasehost/ So this content will be published through website.

DirectoryIndex index.html => This indicates what is the default file to be open when this site is accessed. So when you type ip address(here its 192.168.0.1) in browser it will present with
index.html content.

=>This is to specify the end of that virtual host.

Now save the file and exit.

Step5 : Check for the syntax errors in the httpd.conf file before restarting the apache service.

#httpd -t

Or

#httpd -k graceful

Step6 : Now start the service and then add it to booting scripts so that it will start automatically at every boot of the system

#service httpd restart

#chkconfig httpd on

Step7 : Now check the site using 192.168.0.1 ip address in your browser.

  • Like the post? Please Subscribe to free RSS feed to get updates
  • How To Install Apache Server Source Package On Linux Server?

    0 comments

    How to install apache server source package on Linux server?

    Step1 : Check if the package is installed or not

    #find / -iname httpd.conf

    If you did not find any thing related to apache by using above find command you can install the source package.

    Step2 : We can install source package in /opt for our requirement. Download the package from apache software foundation site

    #cd /opt

    #wget http://mirror.cc.columbia.edu/pub/software/apache//httpd/httpd-2.2.17.tar.gz

    Step3 : Uncompress it and change the directory to source directory

    #tar xvfz httpd-2.2.17.tar.gz

    #cd httpd-2.2.17

    Step4 : Now compile the source code
    #./configure

    #make

    #make install

    Or

    The above three commands can be clubbed together to save time

    #./configure && make && make install

    Note1 : All the configuration files related to apache are stored in /usr/local/apache2/ When we install the source package by default. But if we install it through package installation softwares such as rpm/yum/apt-get the configuration files are stored in /etc/httpd folder

    Note2 : This is important and interview question too. Can we run two apache servers at a time?

    Ans : The answer to this question is yes. And its possible if we use source package to install in two different locations say in /opt and /opt1 and the variable “Listen” is set to different. Ports for this two servers(Bit complex to understand. If you have any questions ask it at http://forums.linuxnix.com our new Linux/Unix forums not officially announced.

    Step5 : Now start the service.

    #/usr/local/apache2/bin/apachectl start

    Step6 : Check if the web server is running or not by accessing local host

    #elinks localhost

    Or

    Access localhost from browser

  • Like the post? Please Subscribe to free RSS feed to get updates
  • How To Install Apache Server On Ubuntu Machine?

    0 comments

    How to install an Apache Server on ubuntu machine(A debian system)?

    Step1 : Check if the package is installed or not

    #dpkg -l | grep apache

    This dpkg -l command is similar to rpm -qa command in Redhat linux to list all the applications installed in your system.

    Step2 : Install the package if you did not get any output

    #apt-get install apache*

    Step3 : Now start the apache service

    #service apache2 restart

    Step4 : On the service at booting time

    #chkconfig apache2 on

    Step5 : Check if the web server is running or not by accessing local host

    #elinks localhost

    Or

    Access localhost from browser

    Here is the screen shot showing the test web page when apache is installed

  • Like the post? Please Subscribe to free RSS feed to get updates
  • Apache Server Installation On Redhat Linux

    0 comments

    How we can install Apache web server on Redhat linux?
    Ans : The simplest way to install Apache on redhat machine is to use yum command. 


    Follow below steps : 
    To install and check if the web server is running with default test page.


    Step1: Check if the package is installed or not


    #rpm -qa | grep httpd


    Step2 : Install the package if you did not get any output


    #yum install httpd


    Step3 : Now start the apache service


    #service httpd restart


    Step4 : On the service at booting time


    #chkconfig httpd on


    Step5 : Check if the web server is running or not by accessing local host


    #elinks localhost


    or 


    Access localhost from browser


    When you access the server through browser red-hat Linux will present you with a test page as shown below


  • Like the post? Please Subscribe to free RSS feed to get updates
  • Many How to's Related To Apache Web Server Is Going To Come On linuxnix.com

    1 comments

    Hi all,
    From today on words we are planing to provide in depth knowledge base on many Howto's related to Apache web server. Some of the howto's which we are going to present are as follows.


    1. About Apache web server
    2. Apache installation[Redhat/Debian]
    3. Apache installation through source
    4. Apache ip based web access
    5. Apache host based web access

    5a.Hosting multiple SSL websites on single host
    6. Apache authentication based web access
    7. Apache SSL based web access
    8. Apache integration with AD(Active Directory) authentication
    9. Apache log monitoring
    10.Apache web server security
    11.Troubleshooting apache
    12.Apache fine tuning
    And many more to come.

    For any queries please feel to comment on this or mail us at surendra@linuxnix.com and feel free to ask if we miss something to post about Apache web server. If you like our posts please refer our site to your friends and spread the knowledge.

  • Like the post? Please Subscribe to free RSS feed to get updates
  • How To Install Apache Tomcat on Linux(Redhat/Ubuntu)?

    1 comments

    How to install Apache tomcat on Linux(Redhat/Ubuntu)?

    What is Apache tomcat?
    Ans : ApacheTomcat is an open source web application server which supports J2ee Servlets, JavaServer, Pages(JSP) and API's. Tomcat should not be confused with Apache web server which an HTTP web server.
    ---Wikipedia.

    Some terminology about Apache tomcat.

    Apache Tomcat can be configured by editing server.xml file. Those who knows apache web server. This server.xml can be taken as synonimas to httpd.conf file.

    Servlet is defined as a way add dynamic content to a Web server using the Java platform. And a servlet container is a compiled, executable program. The servlet container name is tomcat is catalina.

    Pre requists for Apache tomcat are
    1. java
    2. JDK

    Step by step for installing Apache tomcat

    Note : Avoide installing tomcat from reposatories, always prefer to install it from source downloaded from apache site.

    Step1 : Install all the prequistes

    Redhat :

    #yum install java

    Ubuntu :

    #apt-get install java

    Step2 : Download tomcat source package and uncompress it.
    Redhat/Ubuntu
    #cd /opt
    #wget http://www.trieuvan.com/apache/tomcat/tomcat-6/v6.0.29/bin/apache-tomcat-6.0.29.tar.gz
    #tar xvfz apache-tomcat-6.0.29.tar.gz

    Step3 : Setup the paths for Catalina and others.
    Setting catalina paths

    Redhat/ubuntu

    CATALINA_HOME=/opt/apache-tomcat-6.0.29
    CATALINA_BASE=/opt/apache-tomcat-6.0.29

    Setting java paths

    Check what java versions are installed in your system

    #update-alternatives --config java


    This command will display which is default java version used by your machine.

    Example output :

    # update-alternatives --config java

    There are 2 programs which provide 'java'.

    Selection Command
    -----------------------------------------------
    1
    /usr/lib/jvm/jre-1.4.2-gcj/bin/java
    *+ 2
    /usr/lib/jvm/jre-1.6.0-openjdk/bin/java

    Enter to keep the current selection[+], or type selection number:

    If you see above the default java version is 1.6 so set the path to /usr/lib/jvm/jre-1.6.0-openjdk

    JAVA_HOME=/usr/lib/jvm/jre-1.6.0-openjdk
    JDK_HOMe=$JAVA_HOME

    Step4 : Now start tomcat server

    #/opt/apache-tomcat-6.0.29/bin/sartup.sh

    Sample output.

    Using CATALINA_BASE: /opt/apache-tomcat-5.5.26

    Using CATALINA_HOME: /opt/apache-tomcat-5.5.26
    Using CATALINA_TMPDIR: /opt/apache-tomcat-5.5.26/temp
    Using JRE_HOME:
    /usr/lib/jvm/java-1.6.0-openjdk-1.6.0.0/

    Step5 : By default Apache Tomcat will be hosted onlocalhost : 8080 port by default. So try to access the site with web browser

    http://localhost:8080
    or
    http://localhost:8080
    or
    http://systemname:8080

    Stay tuned to other posts about troubleshooting tomcat installation.

  • Like the post? Please Subscribe to free RSS feed to get updates
  • NIC Bonding In Linux

    2 comments

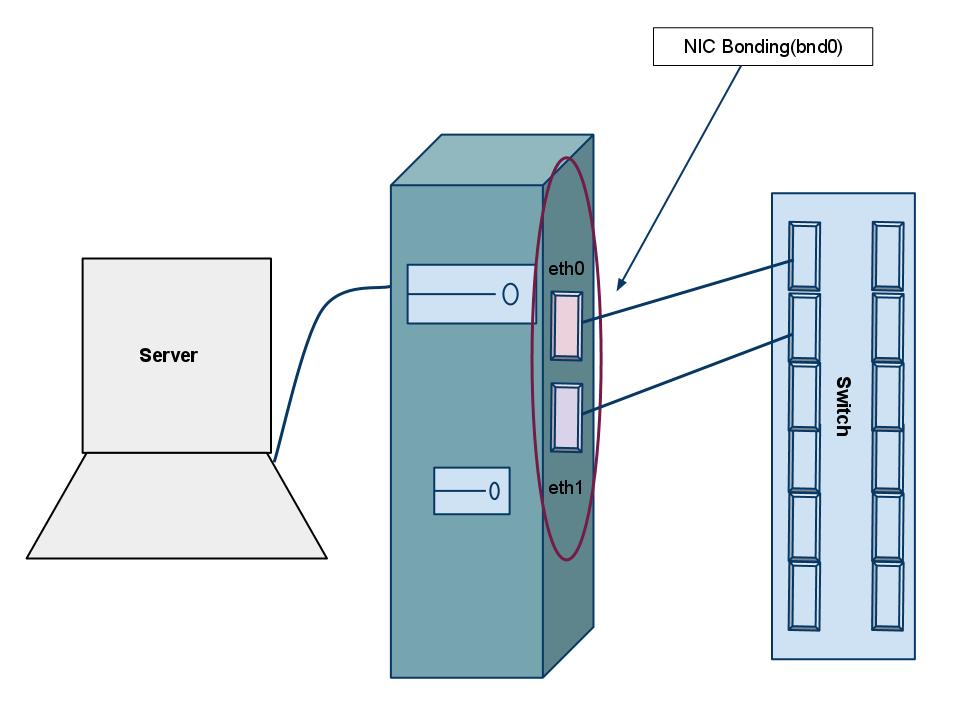
    Nic bonding is defined as bonding of two or more network cards on a server/pc to form a parallel single connection. This is a great way of achieving redundancy to a server if its having more number of network cards. Its having many names like.

    1. Link aggregation
    2. Channel Bonding
    3. NIC Bonding
    4. NIC teaming
    5. Network card Bonding
    6. Ethernet bonding
    7. Trunking
    8. Etherchannel
    9. Multi-link truning(MLT)
    10.Network bonding
    11.Network Fault Tolerance(NFT)
    12.Port channel
    13.Smartgroup
    14.EtherTrunk


    Nic bonding is used to provide two benefits for us

    1. High bandwidth
    2. Redundancy/resilience


    Before Clustering softwares come in to existing this technique is widely used to provide redundancy to a high end server. After cluster software introduced its used to enhance the cluster redundancy.

    In this post we will see how can we achieve Nic bonding.
    Nic bonding will work with the help of bonding driver in kernel.


    Implementing NIC bonding : Participating interfaces.

    eth0

    eth1

    bnd0

    Step1 : Create bond interface file with following content in it

    vi /etc/syconfig/network-scripts/ifcfg-bnd0

    DEVICE=bnd0

    IPADDR=192.168.0.234

    NETWORK=192.168.0.0

    NETMASK=255.255.255.0

    USERCTL=no

    BOOTPROTO=none

    ONBOOT=yes

    GATEWAY=192.168.0.1

    save and exit the file

    Step2 : Now create a bnd0 virtual interface in modprobe.conf as shown below

    alias bnd0 bonding

    options bnd0 miimon=100 mode=6

    Save and exit the file

    Let me explain what actually the above two lines indicates

    Line1 : (alias bnd0 bonding) to load the bonding module in to kernel

    Line2 : Indicate the option for thie bond interface

    miimon is nothing but to MONitor with MIItool to check the availability of other interfaces.

    mode is to specify whether the bond is configured as load balancing or fail over. Here its load-balancing which means data transmission will be shared between two interfaces. To know more about modes click here

    Step3 : Load the module in to kernel with modprob command to update this changes to kernel

    #modprob bonding

    Step4 : edit interface card details of both physical devices

    For eth0

    vi /etc/sysconfig/network-scripts/ifcfg-eth0

    DEVICE=eth0

    USERCTL=no

    ONBOOT=yes

    MASTER=bnd0

    SLAVE=yes

    BOOTPROTO=none

    For eth1

    vi /etc/sysconfig/network-scripts/ifcfg-eth1

    DEVICE=eth1

    USERCTL=no

    ONBOOT=yes

    MASTER=bnd0

    SLAVE=yes

    BOOTPROTO=none

    Save and exit the files

    The above thing is self explanatory for many admins but let me explain to new people.

    DEVICE Indicates what is the device name

    USERCTL Indicates that can user control this device(here its no)

    ONBOOT Indicates that at the boot time do this device should be up?

    MASTER Is this device has master? Then what it is(here its bnd0)

    SLAVE Is this device acting as slave?

    BOOTPROTO What about getting ip add from what protocol?(its set to none which indicate its a static IP)

    Step5 : Restart the network service and see the output of ifconfig for your self.

    #service network restart

    #ifconfig

    Questions & Answers

    1. How can we say my data is flowing in which path?

    Ans : Link aggregation(bonding driver) will take care of sending all the frames of particular session in same path. This is called as ordering of frames.

    2. Can we bond more than 2 NIC?

    Ans : Yes we can, follow the same procedure. In fact there is no limit but linux server do have limit to have total number of NIC cards.

    Tips on implementing NIC bonding

    1. Enable spanning tree for switches, with out which network speed reduces.

    2. Be careful if you’re doing this over a remote ssh.

  • Like the post? Please Subscribe to free RSS feed to get updates
  • Heartbeat Clustering

    17 comments

    Its long time back I have learnt Heartbeat clustering around March-2008, but still this point I never implemented for production servers. This is my first attempt to do it and I am successful in implementing it for two node fail-over Cluster. Clustering is very complex and very advanced topic which I cannot deal with in one post. In this post I will give you some basics of Clustering, advantages of Clustering and configuration of simple fail-over Cluster.
    Let’s start.
    What is a Cluster any way?
    Ans :
    A computer cluster is a group of linked computers, working together closely so that in many respects they form a single computer. The components of a cluster are commonly, but not always, connected to each other through fast local area networks. Clusters are usually deployed to improve performance and/or availability over that of a single computer, while typically being much more cost-effective than single computers of comparable speed or availability
    www.wikipedia.org.
    Cluster terminology.

    Node : It’s one of the system/computer which participates with other systems to form a Cluster.

    Heartbeat : This a pulse kind of single which is send from all the nodes at regular intervals using a UDP packet so that each system will come to know the status of availability of other node. It’s a kind of door knocking activity like pinging a system, So that each node which are participating in Cluster will come to know the status of other nodes availability in the Cluster.

    Floating IP or Virtual IP : This is the IP assigned to the Cluster through which user can access the services. So when ever clients request a service they will be arrived to this IP, and client will not know what are the back-end/actual ip addresses of the nodes. This virtual IP is used to nullify the effect of nodes going down.

    Master node : This is the node most of the time where services are run in a High availability Cluster.

    Slave node : This is the node which is used in High availability Cluster when master node is down. It will take over the role of servicing the users, when it will not receive heartbeat pulse from master. And automatically gives back the control when the master server is up and running. This slave comes to know about the status of master through heartbeat pulse/signals.

    Types of Clusters:
    Cluster types can be divided in to two main types
    1.
    High availability :

    These types of Clusters are configured where there should be no downtime. If one node in the cluster goes down second node will take care of serving users without interrupted service with availability of five nines i.e. 99.999%.

    2. Load balancing :
    These types of Clusters are configured where there are high loads from users. Advantages of load balancing are that users will not get any delays in their request because load on a single system is shared by two or more nodes in the Cluster.

    Advantages of Cluster :
    1.Reduced Cost : Its cheaper to by 10 normal servers and do cluster on them then buying a high end servers like blade servers, which will do more work than a single blade server which have more processing power.
    2. Processing Power
    3. Scalability
    4. Availability

    Configuration files details :
    Three main configuration files :

    · /etc/ha.d/authkeys
    · /etc/ha.d/ha.cf
    · /etc/ha.d/haresources

    Some other configuration files/folders to know :
    /etc/ha.d/resource.d. Files in this directory are very important which contains scripts to start/stop/restart a service run by this Heartbeat cluster.

    Before configuration of Heartbeat Cluster these below points to be noted.

    Note1 : The contents of ha.cf file are same in all the nodes in a cluster, except ucast and bcast derivatives.

    Note2 : The contents of authkeys and haresources files are exact replica on all the nodes in a cluster.

    Note3 : A cluster is used to provided a service with high availability/high performance, that service may be a web server, reverse proxy or a Database.

    Test scenario setup:
    1.
    The cluster configuration which I am going to show is a
    two node cluster with failover capability for a Squid reverse proxy..
    2.For Squid reverse proxy configuration please click here..
    3.
    Node details are as follows

    Node1 :
    IpAddress(eth0):10.77.225.21
    Subnetmask(eth0):255.0.0.0
    Default Gateway(eth0):10.0.0.1
    IpAddress(eth1):192.168.0.1(To send heartbeat signals to other nodes)
    Sub net mask (eth1):255.255.255.0
    Default Gateway (eth1):None(don’t specify any thing, leave blank for this interface default gateway).

    Node2 :
    IpAddress(eth0):10.77.225.22
    Subnetmask(eth0):255.0.0.0
    Default Gateway (eth0):10.0.0.1
    IpAddress(eth1):192.168.0.2(To send heartbeat signals to other nodes)
    Sub net mask (eth1):255.255.255.0
    Default Gateway(eth1):None(don’t specify any thing, leave blank for this interface default gateway).

    4. Floating Ip address:10.77.225.20

    Lets start configuration of Heartbeat cluster. And make a note that ever step in this Heartbeat cluster configuration is divided in two parts parts

    1.(configurations on node1)
    2.(configurations on node2)

    For better understanding purpose

    Step1 :
    Install the following packages in the same order which is shown

    Step1(a) : Install the following packages on node1
    #rpm -ivh heartbeat-2.1.2-2.i386.rpm
    #rpm -ivh heartbeat-ldirectord-2.1.2-2.i386.rpm
    #rpm -ivh heartbeat-pils-2.1.2-2.i386.rpm
    #rpm -ivh heartbeat-stonith-2.1.2-2.i386.rpm

    Step1(b) : Install the following packages on node2
    #rpm -ivh heartbeat-2.1.2-2.i386.rpm
    #rpm -ivh heartbeat-ldirectord-2.1.2-2.i386.rpm
    #rpm -ivh heartbeat-pils-2.1.2-2.i386.rpm
    #rpm -ivh heartbeat-stonith-2.1.2-2.i386.rpm


    Step2 : By default the main configuration files (ha.cf, haresources and authkeys) are not present in /etc/ha.d/ folder we have to copy these three files from /usr/share/doc/heartbeat-2.1.2 to /etc/ha.d/

    Step2(a) : Copy main configuration files from /usr/share/doc/heartbeat-2.1.2 to /etc/ha.d/ on node 1
    #cp /usr/share/doc/heartbeat-2.1.2/ha.cf /etc/ha.d/
    #cp /usr/share/doc/heartbeat-2.1.2/haresources /etc/ha.d/
    #cp /usr/share/doc/heartbeat-2.1.2/authkeys /etc/ha.d/

    Step2(b) : Copy main configuration files from /usr/share/doc/heartbeat-2.1.2 to /etc/ha.d/ on node 2
    #cp /usr/share/doc/heartbeat-2.1.2/ha.cf /etc/ha.d/
    #cp /usr/share/doc/heartbeat-2.1.2/haresources /etc/ha.d/
    #cp /usr/share/doc/heartbeat-2.1.2/authkeys /etc/ha.d/


    Step3 : Edit ha.cf file
    #vi /etc/ha.d/ha.cf

    Step3(a) : Edit ha.cf file as follows on node1
    debugfile /var/log/ha-debug
    logfile /var/log/ha-log
    logfacility local0
    keepalive 2
    deadtime 25
    warntime 10
    initdead 50
    udpport 694
    bcast eth1
    ucast eth1 192.168.0.1
    auto_failback on
    node rp1.linuxnix.com
    node rp2.linuxnix.com

    Step3(b) : Edit ha.cf file as follows on node2
    debugfile /var/log/ha-debug
    logfile /var/log/ha-log
    logfacility local0
    keepalive 2
    deadtime 25
    warntime 10
    initdead 50
    udpport 694
    bcast eth1
    ucast eth1 192.168.0.2
    auto_failback on
    node rp1.linuxnix.com
    node rp2.linuxnix.com


    Let me explain each entry in detail:
    Debugfile :
    This is the file where debug info with good details for your heartbeat cluster will be stored, which is very much useful to do any kind of troubleshooting.

    Logfile : This is the file where general logging of heartbeat cluster takes place.

    Logfacility : This directive is used to specify where to log your heartbeat logs(if its local that indicates store logs locally or if it’s a syslog then store it on remote server and none to disable logging). And there are so many other options, please explore yourself.

    Keepalive : This directive is used to set the time interval between heartbeat packets and the nodes to check the availability of other nodes. In this example I specified it as two seconds(keepalive 2).

    Deadtime : A node is said to be dead if the other node didn’t receive any update form it.

    Warntime : Time in seconds before issuing a "late heartbeat" warning in the logs.

    Initdead : With some configurations, the network takes some time to start working after a reboot. This is a separate "deadtime" to handle that case. It should be at least twice the normal deadtime.

    Udpport : This is the port used by heartbeat to send heartbeat packet/signals to other nodes to check availability(here in this example I used default port:694).

    Bcast : Used to specify on which device/interface to broadcast the heartbeat packets.

    Ucast : Used to specify on which device/interface to unicast the heartbeat packets.

    auto_failback : This option determines whether a resource will automatically fail back to its "primary" node, or remain on whatever node is serving it until that node fails, or an administrator intervenes. In my example I have given as on that indicate if the failed node come back online, controle will be given to this node automatically. Let me put it in this way. I have two nodes node1 and node2. My node one machine is a high end one and node is for serving temporary purpose when node 1 goes down. Suppose node1 goes down, node2 will take the control and serve the service, and it will check periodically for node1 starts once it find that node 1 is up, the control is given to node1.

    Node : This is used to specify the participated nodes in the cluster. In my cluster only two nodes are participating (rp1 and rp2) so just specify that entries. If in your implementation more nodes are participating please specify all the nodes.


    Step4 : Edit haresources file
    #vi /etc/ha.d/haresources

    Step4(a) : Just specify below entry in last line of this file on node1
    rp1.linuxnix.com 10.77.225.20 squid

    Step4(b) : Just specify below entry in last line of this file on node1
    rp1.linuxnix.com 10.77.225.20 squid

    Explanation of each entry :
    rp1.linuxnix.com
    is the
    main node in the cluster
    10.77.225.20
    is the floating ip address of this cluster.

    Squid : This is the service offered by the cluster. And make a note that this is the script file located in /etc/ha.d/ resource.d/.

    Note : By default squid script file will not be there in that folder, I created it according to my squid configuration.

    What actually this script file contains?
    Ans :
    This is just a start/stop/restart script for the particular service. So that heartbeat cluster will take care of the starting/stoping/restarting of the service(here its squid).
    Here is what squid script file contains.
    http://sites.google.com/site/surendra/Home/squid.txt.txt?attredirects=0&d=1

    Step5 : Edit authkeys file, he authkeys configuration file contains information for Heartbeat to use when authenticating cluster members. It cannot be readable or writeable by anyone other than root. so change the permissions of the file to 600 on both the nodes..

    Two lines are required in the authkeys file:
    A line which says which key to use in signing outgoing packets.
    One or more lines defining how incoming packets might be being signed.

    Step5 (a) : Edit authkeys file on node1
    #vi /etc/ha.d/authkeys
    auth 2
    #1 crc
    2 sha1 HI!
    #3 md5 Hello!
    Now save and exit the file

    Step5 (b) : Edit authkeys file on node2
    #vi /etc/ha.d/authkeys
    auth 2
    #1 crc
    2 sha1 HI!
    #3 md5 Hello!
    Now save and exit the file


    Step6 : Edit /etc/hosts file to give entries of hostnames for the nodes


    Step6(a) : Edit /etc/hosts file on node1 as below

     
    10.77.225.21 rp1.linuxnix.com rp1
    10.77.225.22 rp2.linuxnix.com rp2


    Step6(b) : Edit /etc/hosts file on node2 as below
     
    10.77.225.21 rp1.linuxnix.com rp1
    10.77.225.22 rp2.linuxnix.com rp2

    Step7 : Start Heartbeat cluster

    Step7(a) : Start heartbeat cluster on node1
    #service heartbeat start

    Step7(b) : Start heartbeat cluster on node2
    #service heartbeat start

    Checking your Heartbeat cluster:
    If your heartbeat cluster is running fine a Virtual Ethernet Interface is created on
    node1 and 10.77.225.20
    Clipped output of my first node
    # ifconfig

    Eth0 Link encap:Ethernet HWaddr 00:02:A5:4C:AF:8E
    inet addr:10.77.225.21 Bcast:10.77.231.255 Mask:255.255.248.0
    inet6 addr: fe80::202:a5ff:fe4c:af8e/64 Scope:Link
    UP BROADCAST RUNNING MULTICAST MTU:1500 Metric:1
    RX packets:5714248 errors:0 dropped:0 overruns:0 frame:0
    TX packets:19796 errors:0 dropped:0 overruns:0 carrier:0
    collisions:0 txqueuelen:1000
    RX bytes:1533278899 (1.4 GiB) TX bytes:4275200 (4.0 MiB)
    Base address:0x5000 Memory:f7fe0000-f8000000

    Eth0:0
    Link encap:Ethernet HWaddr 00:02:A5:4C:AF:8E
    inet addr:10.77.225.20 Bcast:10.77.231.255 Mask:255.255.248.0
    UP BROADCAST RUNNING MULTICAST MTU:1500 Metric:1
    Base address:0x5000 Memory:f7fe0000-f8000000

    Eth1
    Link encap:Ethernet HWaddr 00:02:A5:4C:AF:8F
    inet addr:192.168.0.1 Bcast:192.168.0.255 Mask:255.255.255.0
    inet6 addr: fe80::202:a5ff:fe4c:af8f/64 Scope:Link
    UP BROADCAST RUNNING MULTICAST MTU:1500 Metric:1
    RX packets:145979 errors:0 dropped:0 overruns:0 frame:0
    TX packets:103753 errors:0 dropped:0 overruns:0 carrier:0
    collisions:0 txqueuelen:100
    RX bytes:38966724 (37.1 MiB) TX bytes:27640765 (26.3 MiB)
    Base address:0x5040 Memory:f7f60000-f7f80000

    Try accessing your browser whether Squid is working fine or not. Please follow up comming posts how to troubleshoot heartbeat cluster.

  • Like the post? Please Subscribe to free RSS feed to get updates
  • SNORT(IDS/IPS) Configuration and Implemenation

    0 comments

    Lets start how to install SNORT which is An Intrusion detection system (IDS) and an Intrusion Prevention System (IPS). We tested installation of SNORT on RHEL5.
    Step1 : Download following packages
    libpcap-1.0.0.tar.gz
    pcre-8.00.tar.gz
    libnet-1.0.2a.tar.gz (This is optional package if you want SMB popup alerts on window’s machines.)
    snort-2.8.5.1.tar.gz
    acid-0.9.6b23.tar.gz
    Note : Don’t try to install SNORT through rpm packages, try to install them from source packages because there will be so many dependencies. And install the above packages in the same order to resolve dependencies.
    Step2 : Untar packages one by one.
    #tar xvfz packagename.tar.gz
    Step3 : Change the directory to libpcap-1.0.0 and Just run ./configure shell script, this will check system attributes and generate make file, which is used to install libpcap package as following.
    #cd libpcap-1.0.0
    #./configuration
    #make
    #make install
    Note : If anything goes wrong please search that error message in google..
    Step4 : After installing libpcap install pcre package for doing regular expression query in checking the packet capture to match multiple entries. First change the directory to pcre-8.00 then start executing following commands
    #cd ../pcre-8.00
    #./configure
    #make
    #make check
    #make install
    Step5 : Now install libnet package..
    #cd ../libnet-1.0.2a
    #./configure
    #make
    #make check
    #make install
    Step6 : Now install the important package in our game of implementing IDS/IDP ie our SNORT package. Just follow below commands to install SNORT. You have to be careful in this step because we can install SNORT in standalone system or a complete system with DB/web server/acid support. If you are planning to install SNORT in standalone just execute ./configure after changing to snort-2.8.5.1 directory. But here I am going to build a complete SNORT system will all the capabilities. Before that we should know what are the content of snort source directory. Please get some knowledge on it and read the required readme files in doc/ folder.
    Note : Before installing SNORT do the following things (Before installation you can do this).
    1. Make sure that you copy etc/ content in source directory to /etc directory
    2. Create /var/log/ snort directory for snort logging activity (remember we have to mention this path in main configuration file, in our case it will be /etc/snort/etc/snort.conf.
    3. Create /etc/snort/rules directory for creating rules files for snort.
    #mkdir /etc/snort
    # cp -ar ./etc /etc/snort/
    #mkdir /var/log/snort
    # mkdir /etc/snort/rules
    Now start installing SNORT
    # ./configure --with-mysql --with-snmp --enable-smbalerts --enable-flexresp
    #make
    #make check
    #make install
    Hmm..! good we are done with the installation of SNORT
    So in the next post I will show you how to configure, integrate SNORT with Mysql and ACID.
    Please Comment your thoughts regarding this post:-)

  • Like the post? Please Subscribe to free RSS feed to get updates
  • N.A.G.I.O.S

    6 comments

    N.A.G.I.O.S
    NAGIOS(N.A.G.I.O.S. is a recursive acronym: "Nagios Ain't Gonna Insist On Sainthood", "Sainthood" being a reference to the original name of the software, which was changed in response to a legal challenge by owners of a similar trademark). --wikipedia.org
    NAGIOS is a system and network monitoring application that watches host and services that we specify as well as alerting when finds any error.

    NAGIOS is implemented by using SNMP protocol, so which ever devices support SNMP we can monitor that device using NAGIOS.

    NAGIOS can do following things
    1.Monitor wide range of hosts like Servers,Switches,Routers etc.
    2.Monitor network services (Like :
    SMTP, POP3, HTTP, NNTP, ICMP, SNMP, FTP, SSH.)
    3.Monitor Host resources (Processor load, Running processes, Disk usage, System logs, etc)
    4.Monitor Host environments(Temperature, Alarms etc).
    Can alert you through e-mail, SMS, Pager etc.

    NAGIOS can not do Monitoring of Bandwidth utilization in network.


    Installing NAGIOS:

    Step1: Before installing NAGIOS we required some packages to be installed, These are listed as below.
    Apache(For accessing NAGIOS web interface),
    gcc compiler,glibc, glibc-common and gd development library(for compiling source code which we are going download ).

    # yum install httpd
    # yum install gcc
    # yum install glibc*
    # yum install gd*

    Step2 : First we have Create a new NAGIOS user account , group and its password.
    # useradd nagios
    # passwd nagios
    # groupadd nagcmd
    # usermod -G nagcmd nagios
    # usermod -G nagcmd apache

    We are adding "nagcmd" as secondary group to both "nagios" and "apache" user because some times we require to execute commands through web interface.

    Step3 : Create a directory called download and download Nagios and its pluggins.

    # mkdir ~/download
    # cd ~/download
    # cd
    # wget
    http://osdn.dl.sourceforge.net/sourceforge/nagios/nagios-3.0.2.tar.gz
    # wget
    http://osdn.dl.spurceforge.net/sourceforge/nagiosplug/nagios-pluggins-1.4.11.tar.gz


    If you are unable to download using wget then use the following link to download nagios through GUI and nagiosplug:- http://www.nagios.org/download

    Step4 : Now its time to Compile and install Nagios, to do this uncompress the tarball file and do as follows:

    # cd /root/download
    # tar -xvzf nagios-3.1.2.tar.gz ## extract the tar file.
    # cd nagio-3.1.2
    # ./configure --with-command-group=nagcmd
    # make all

    Stpe5 : Now Install binaries, init script, sample config file and set permissions on the external command(make install-commandmod) directory.

    # make install
    # make install-init
    # make install-config
    # make install-commandmod


    Now NAGIOS is installed and the configuring files are stored in /usr/local/nagios/etc


    Step6 : Install the NAGIOS web config file in the Apache conf.d directory.

    # make install-webconf

    Step7 : Create a nagiosadmin account for logging into the Nagios web interface.

    # htpasswd -c /usr/local/nagios/etc/htpasswd.users nagiosadmin

    Here it will ask for new password, enter the password and remember it in order to access NAGIOS web interface.


    Step8 : Start nagios service by using below commands and add the nagios service to run at system start-up time.


    # /usr/local/nagios/bin/nagios -v /usr/local/nagios/etc/nagios.cfg

    When we execute the above command the output will be as below.

    Output like this:-
    Nagios 3.0.2
    Copyright (c) 1999-2008 Ethan Galstad (http://www.nagios.org/)
    Last Modified: 05-19-2008
    License: GPL

    Reading configuration data...

    Running pre-flight check on configuration data...

    Checking services...
    Checked 35 services.
    Checking hosts...
    Checked 4 hosts.
    Checking host groups...
    Checked 1 host groups.
    Checking service groups...
    Checked 0 service groups.
    Checking contacts...
    Checked 1 contacts.
    Checking contact groups...
    Checked 1 contact groups.
    Checking service escalations...
    Checked 0 service escalations.
    Checking service dependencies...
    Checked 0 service dependencies.
    Checking host escalations...
    Checked 0 host escalations.
    Checking host dependencies...
    Checked 0 host dependencies.
    Checking commands...
    Checked 25 commands.
    Checking time periods...
    Checked 5 time periods.
    Checking for circular paths between hosts...
    Checking for circular host and service dependencies...
    Checking global event handlers...
    Checking obsessive compulsive processor commands...
    Checking misc settings...

    Total Warnings: 0
    Total Errors: 0

    Things look okay - No serious problems were detected during the pre-flight check.
    If output comes like this, it means there is no error.

    Step9 : start the nagios service and configure the service to run at start-up time of the system

    # service nagios start
    # chkconfig --add nagios
    # chkconfig nagios on

    Stpe10 : Use the following command to run the CGIs under the SElinux enforcing/targated mode. This will eliminate security loopholes.

    # chcon -R -t httpd_sys_content_t /usr/local/nagios/sbin/
    # chcon -R -t httpd_sys_content_t /usr/local/nagios/share/

    Stpe11 : Now change the contact details in
    /usr/local/nagios/etc/objects/contacts.cfg, you will find nagiosadmin, change the e-mail id associated to it with your required e-mail id, so that alerts .


    Step12 : Now restart the apache server

    # service httpd restart


    Step13 : Access the Nagios web interface through your web browser:

    http://localhost/nagios/

    Note:- Here you will be prompted for the username (nagiosadmin) and password that is given by you at step7 ).

    I will update the blog how to monitor different devices such as Servers, Network devices and System resources and how to get alerts through SMS, e-mail and Pager. Please keep us visiting.


  • Like the post? Please Subscribe to free RSS feed to get updates
  • Server configuration file syntax Checking commands

    2 comments

    SERVER CONFIGURATION FILE SYNTAX CHECKING COMMANDS.

    I have planned to write this post some long time ago, now the time has come to do it.

    Basically configuring servers in Linux/*nix include editing of configuration files and saving them. Once editing the files if any syntax error is there and when we start the service they will show some wearied errors which we cant resolve.
    For counter attacking this type of issues for each service there will be one command to check this syntax errors before starting of the service/server, I have collected these commands from my experience and from some of my friends. Please feel free to comment on this if you know some other commands so that I will update my post.

    SSHD server check for syntax error
    =========================
    sshd -t

    FTP server check for syntax error
    =========================
    #vsftpd

    DNS server check for syntax error
    ==========================

    For checking syntax errors in main configuration file..
    #named-checkconf main-config-file

    Example:
    #named-checkconf named.conf

    Syntax OK

    #named-checkzone domain zonefile-loc

    Example:
    #named-checkzone example.com /var/named/chroot/var/named/exaple-zone.frd

    SAMBA server check for syntax error
    =============================
    #testparm

    APACHE server check for syntax error
    =============================
    httpd -t

    For virtual hosts

    httpd -t -D DUMP_VHOSTS

    TCP Wrappers check for syntax error
    ============================
    tcpdchk
    tcpdchk -v


    Postfox server check for syntax error
    ============================
    postfix check
    postfix -vv


    LIGHTTPD
    server check for syntax error
    =============================
    lighttpd -t -f /etc/lighttpd/lighttpd.conf

    Squid
    server check for syntax error
    ==========================
    squid -k check
    squid -k parse


    NAGIOS server check for syntax error
    ====================================
    /usr/local/nagios/bin/nagios -v /usr/local/nagios/etc/nagios.cfg

  • Like the post? Please Subscribe to free RSS feed to get updates
  • How To Install YUM Server In Redhat(RHEL5)

    0 comments

    In linux you can install packages through many ways like.
    1. Through RPM,
    2. Through shell script
    3. Through source tar balls etc.

    YUM(Yellow-dog Updater and Modifier) is another and advanced way of installing the packages in Linux distros such as Red-hat, Fedora.

    In RHEL4 installing packages is a tedious process, some times its headache to install all the dependencies. So Red-hat people come with a solution to overcome this problem in most situations, i.e. nothing but YUM implementation which will resolve this dependency issue. Here I am going to present some basic way how to use YUM utility to install packages locally(there are so many ways to install packages from different sources such as ftp, http etc). You can get the full details about YUM in my google docs here. One Two Three Four Five Six Seven Eight Nine Ten

    Basic YUM implementation locally:
    Step1 :
    Copy the entire OS cd's content to Hard-drive as below.

    #cp -ar /media/cdrom/* /destinationfolder

    Example : #cp -ar /media/cdrom/* /var/ftp/pub

    Note :

    1. From second cd on words no need to copy entire cd contents to drive just copy Server content in to drive.

    2. Here please take destination folder as /var/ftp/pub so that we can implement FTP server to share our reposatory.

    3. If you have RHEL5 DVD then just continue with second step.

    #cp -ar /media/cdrom/Server/* /var/ftp/pub/Server/

    Step2 : Now change the directory to /destinationfolder/Server and install the createrepo package #rpm -ivh createrepo.0.4.4-2 --aid

    Step3 : Specify the reposatory location to YUM.

    #createrep -v /destinationfolder/

    Step4 : Create a file with repo as extention and specify the YUM details in /etc/yum.repos.d folder

    #cd /etc/yum.repos.d/ #vi testing.repo

    Note : The directory /etc/yum.repos.d/ contaions two .repo files which should be moved or removed to other directory, so that YUM server will check default .repo file it self. The new file which is created contains as follows

    [station1.example.com]

    comment ="test"

    baseurl=file:///destinationfolder

    gpgcheck=0

    After entring these entries save and exit from the file.

    Let me explain what acutally this four entries mean.

    [station1.example.com] ==>This informs what is the reposatory name.

    Comment ==> Its used to see the inforamtion about the repo.

    Baseurl ==> This is the server and path of the repo(here its a local repo so the base url is just a file:///

    For example you are creating YUM server through FTP then base url should be like this

    baseurl=ftp://station1.example.com/pub/Server gpgcheck ==> This is to check the authentication of the repository, which is disabled in this case.

    Local YUM repository is created, now you can install any package you want with yum command. In order to know more about YUM, Please see man pages for YUM.

    Basic YUM Server Reposatory through FTP server :
    So what about Installing packages remotly by using this reposatory?

    Let us see how to configure client to access this repository. Before doing client configuration we have to share this reposatory through FTP or HTTP.

    Step1 : Install vsftpd server on server

    #yum install vsftpd

    Step2 : Start the ftp service and on it

    #service vsftpd restart

    #chkconfig vsftpd on

    Thats it on the server side every thing configured properly, Now move on to client machine Confugration on client side :

    Step3 : Remove/move the local reposatory file from /etc/yum.repo.d/ folder to some other location #mv /etc/yum.repo.d/* /safe-loc/

    Step4 : Create server.repo file in /etc/yum.repo.d/ with following contents [station1.example.com]

    comment ="test"

    baseurl=ftp://station1.example.com/pub/Server

    gpgcheck=0

    Save and exit the file Now start using yum to install packages, as follows.

    #yum install packagename

    Example : #yum install httpd

    To uninstall a package through YUM

    #yum remove httpd

    To see the info of a package

    #yum info packagename

    To see the package is already installed or not

    #rpm -qa grep packagename

  • Like the post? Please Subscribe to free RSS feed to get updates
  • Amand -An Network Level Backup System In Linux

    0 comments

    Amanda is well know for taking backup for all the systems in network.

    The Advanced Maryland Automatic Network Disk Archiver(AMANDA). Amanda is a backup system designed to archive many computers on a network to a single large-capacity tape drive.
    You can get more details in these links.

  • Like the post? Please Subscribe to free RSS feed to get updates
  • Archive

    Translate this page


    The Linux Juggernaut | Copyright 2006-2009 Surendra Kumar Anne | Surendra's Home Page | Give us feedback how we are doing, Click here