Nic bonding is defined as bonding of two or more network cards on a server/pc to form a parallel single connection. This is a great way of achieving redundancy to a server if its having more number of network cards. Its having many names like.
1. Link aggregation
2. Channel Bonding
3. NIC Bonding
4. NIC teaming
5. Network card Bonding
6. Ethernet bonding
7. Trunking
8. Etherchannel
9. Multi-link truning(MLT)
10.Network bonding
11.Network Fault Tolerance(NFT)
12.Port channel
13.Smartgroup
14.EtherTrunk
1. Link aggregation
2. Channel Bonding
3. NIC Bonding
4. NIC teaming
5. Network card Bonding
6. Ethernet bonding
7. Trunking
8. Etherchannel
9. Multi-link truning(MLT)
10.Network bonding
11.Network Fault Tolerance(NFT)
12.Port channel
13.Smartgroup
14.EtherTrunk
Nic bonding is used to provide two benefits for us
1. High bandwidth
2. Redundancy/resilience
Before Clustering softwares come in to existing this technique is widely used to provide redundancy to a high end server. After cluster software introduced its used to enhance the cluster redundancy.
In this post we will see how can we achieve Nic bonding.
Nic bonding will work with the help of bonding driver in kernel.
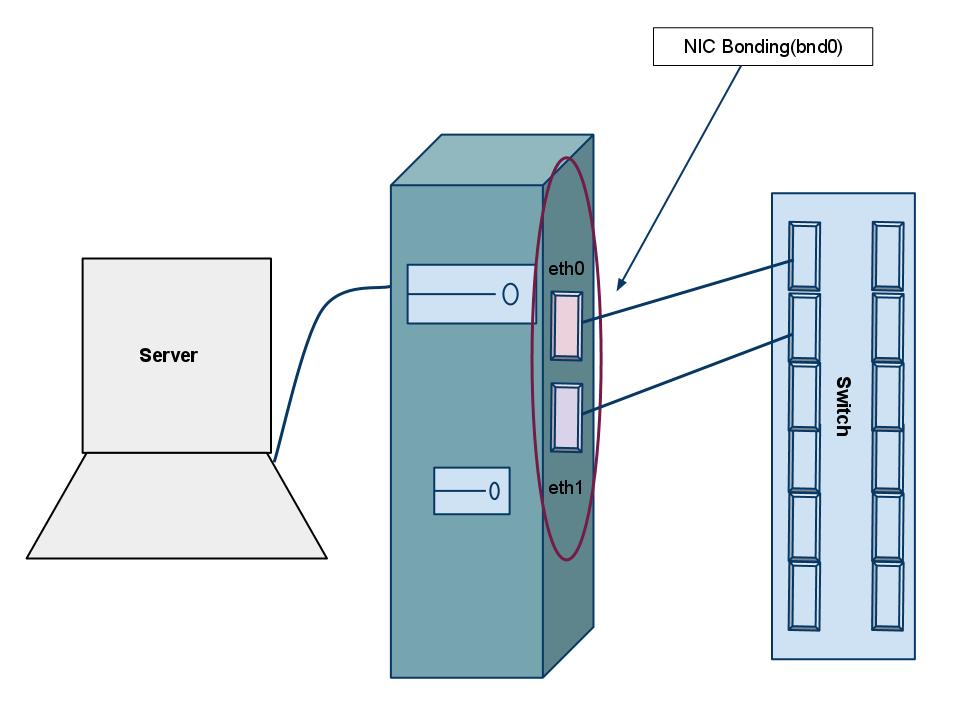
Implementing NIC bonding : Participating interfaces.
eth0
eth1
bnd0
Step1 : Create bond interface file with following content in it
vi /etc/syconfig/network-scripts/ifcfg-bnd0
DEVICE=bnd0
IPADDR=192.168.0.234
NETWORK=192.168.0.0
NETMASK=255.255.255.0
eth1
bnd0
Step1 : Create bond interface file with following content in it
vi /etc/syconfig/network-scripts/ifcfg-bnd0
DEVICE=bnd0
IPADDR=192.168.0.234
NETWORK=192.168.0.0
NETMASK=255.255.255.0
USERCTL=no
BOOTPROTO=none
ONBOOT=yes
GATEWAY=192.168.0.1
save and exit the file
Step2 : Now create a bnd0 virtual interface in modprobe.conf as shown below
alias bnd0 bonding
options bnd0 miimon=100 mode=6
Save and exit the file
Let me explain what actually the above two lines indicates
Line1 : (alias bnd0 bonding) to load the bonding module in to kernel
Line2 : Indicate the option for thie bond interface
miimon is nothing but to MONitor with MIItool to check the availability of other interfaces.
mode is to specify whether the bond is configured as load balancing or fail over. Here its load-balancing which means data transmission will be shared between two interfaces. To know more about modes click here
Step3 : Load the module in to kernel with modprob command to update this changes to kernel
#modprob bonding
Step4 : edit interface card details of both physical devices
For eth0
vi /etc/sysconfig/network-scripts/ifcfg-eth0
DEVICE=eth0
USERCTL=no
ONBOOT=yes
MASTER=bnd0
SLAVE=yes
BOOTPROTO=none
For eth1
vi /etc/sysconfig/network-scripts/ifcfg-eth1
DEVICE=eth1
USERCTL=no
ONBOOT=yes
MASTER=bnd0
SLAVE=yes
BOOTPROTO=none
Save and exit the files
The above thing is self explanatory for many admins but let me explain to new people.
DEVICE Indicates what is the device name
USERCTL Indicates that can user control this device(here its no)
ONBOOT Indicates that at the boot time do this device should be up?
MASTER Is this device has master? Then what it is(here its bnd0)
SLAVE Is this device acting as slave?
BOOTPROTO What about getting ip add from what protocol?(its set to none which indicate its a static IP)
Step5 : Restart the network service and see the output of ifconfig for your self.
#service network restart
#ifconfig
Questions & Answers
1. How can we say my data is flowing in which path?
Ans : Link aggregation(bonding driver) will take care of sending all the frames of particular session in same path. This is called as ordering of frames.
2. Can we bond more than 2 NIC?
Ans : Yes we can, follow the same procedure. In fact there is no limit but linux server do have limit to have total number of NIC cards.
Tips on implementing NIC bonding
1. Enable spanning tree for switches, with out which network speed reduces.
2. Be careful if you’re doing this over a remote ssh.
BOOTPROTO=none
ONBOOT=yes
GATEWAY=192.168.0.1
save and exit the file
Step2 : Now create a bnd0 virtual interface in modprobe.conf as shown below
alias bnd0 bonding
options bnd0 miimon=100 mode=6
Save and exit the file
Let me explain what actually the above two lines indicates
Line1 : (alias bnd0 bonding) to load the bonding module in to kernel
Line2 : Indicate the option for thie bond interface
miimon is nothing but to MONitor with MIItool to check the availability of other interfaces.
mode is to specify whether the bond is configured as load balancing or fail over. Here its load-balancing which means data transmission will be shared between two interfaces. To know more about modes click here
Step3 : Load the module in to kernel with modprob command to update this changes to kernel
#modprob bonding
Step4 : edit interface card details of both physical devices
For eth0
vi /etc/sysconfig/network-scripts/ifcfg-eth0
DEVICE=eth0
USERCTL=no
ONBOOT=yes
MASTER=bnd0
SLAVE=yes
BOOTPROTO=none
For eth1
vi /etc/sysconfig/network-scripts/ifcfg-eth1
DEVICE=eth1
USERCTL=no
ONBOOT=yes
MASTER=bnd0
SLAVE=yes
BOOTPROTO=none
Save and exit the files
The above thing is self explanatory for many admins but let me explain to new people.
DEVICE Indicates what is the device name
USERCTL Indicates that can user control this device(here its no)
ONBOOT Indicates that at the boot time do this device should be up?
MASTER Is this device has master? Then what it is(here its bnd0)
SLAVE Is this device acting as slave?
BOOTPROTO What about getting ip add from what protocol?(its set to none which indicate its a static IP)
Step5 : Restart the network service and see the output of ifconfig for your self.
#service network restart
#ifconfig
Questions & Answers
1. How can we say my data is flowing in which path?
Ans : Link aggregation(bonding driver) will take care of sending all the frames of particular session in same path. This is called as ordering of frames.
2. Can we bond more than 2 NIC?
Ans : Yes we can, follow the same procedure. In fact there is no limit but linux server do have limit to have total number of NIC cards.
Tips on implementing NIC bonding
1. Enable spanning tree for switches, with out which network speed reduces.
2. Be careful if you’re doing this over a remote ssh.


