Hi all,
I am very much pleased to announce Christmas/New year gift for you people. We just started our new Linux/Unix forums to resolve our issues which we are facing on day to day basis at work as well as home. Please join hands with us to help others who are in need.
The forums can be accessed at http://forums.linuxnix.com
The forums are free to all
The forums does not require to register but we suggest you to register and post questions.
As a www.linuxnix.com admin I am very much awaited to see all you there discussing on various issues faced by you in Linux/Unix which will benefit us all.
Thanks,
Admin
http://www.linuxnix.com
http://forums.linuxnix.com is activate for Public
0 commentsLabels: General
Facing Issue With Blogger. Posts On Apache Will Be Delayed
0 commentsLabels: General
Hi all,
We are facing issues with posting apache posts on linuxnix.com. This is because the apache code is messing up with html rendring of blogger. So we are not able to post Virtulhost codes in the site. We will come up with a solution to resolve this issue. Mean time we are continuing with other posts. We will let you people know when we will start the apache posting once again.
Thanks,
Admin
http://www.linuxnix.com
How To Access Web Server Through IP Address?
0 commentsLabels: Advanced Servers, DNS Servers, How-To's
How to access web server through ip address(not the default site)?
Step1 : check for the package installed or not
#rpm -qa | grep httpd
Step2 : Install the package
#yum install httpd
Step3 : Create the root web directory and a test index.html for this testing.
I want to create my web directory in /ipbasehost
#mkdir /ipbasehost
Now create index.html and try to write something in to that file then save the file.
#vi /ipbasehost/index.html
save and exit the file.
Step4 : Now edit the httpd.config file
#vi /etc/httpd/conf/httpd.conf
Go to last line and write the below content
DocumentRoot /ipbasehost/
DirectoryIndex index.html
Save the file and exit.
Let me explain above four lines
DocumentRoot /ipbasehost/ => This indicates where is my document root i.e., all my web content should be placed under /ipbasehost/ So this content will be published through website.
DirectoryIndex index.html => This indicates what is the default file to be open when this site is accessed. So when you type ip address(here its 192.168.0.1) in browser it will present with
index.html content.
=>This is to specify the end of that virtual host.
Now save the file and exit.
Step5 : Check for the syntax errors in the httpd.conf file before restarting the apache service.
#httpd -t
Or
#httpd -k graceful
Step6 : Now start the service and then add it to booting scripts so that it will start automatically at every boot of the system
#service httpd restart
#chkconfig httpd on
Step7 : Now check the site using 192.168.0.1 ip address in your browser.
How To Install Apache Server Source Package On Linux Server?
0 commentsLabels: Advanced Servers, DNS Servers
How to install apache server source package on Linux server?
Step1 : Check if the package is installed or not
#find / -iname httpd.conf
If you did not find any thing related to apache by using above find command you can install the source package.
Step2 : We can install source package in /opt for our requirement. Download the package from apache software foundation site
#cd /opt
#wget http://mirror.cc.columbia.edu/pub/software/apache//httpd/httpd-2.2.17.tar.gz
Step3 : Uncompress it and change the directory to source directory
#tar xvfz httpd-2.2.17.tar.gz
#cd httpd-2.2.17
Step4 : Now compile the source code
#./configure
#make
#make install
Or
The above three commands can be clubbed together to save time
#./configure && make && make install
Note1 : All the configuration files related to apache are stored in /usr/local/apache2/ When we install the source package by default. But if we install it through package installation softwares such as rpm/yum/apt-get the configuration files are stored in /etc/httpd folder
Note2 : This is important and interview question too. Can we run two apache servers at a time?
Ans : The answer to this question is yes. And its possible if we use source package to install in two different locations say in /opt and /opt1 and the variable “Listen” is set to different. Ports for this two servers(Bit complex to understand. If you have any questions ask it at http://forums.linuxnix.com our new Linux/Unix forums not officially announced.
Step5 : Now start the service.
#/usr/local/apache2/bin/apachectl start
Step6 : Check if the web server is running or not by accessing local host
#elinks localhost
Or
Access localhost from browser
How To Install Apache Server On Ubuntu Machine?
0 commentsLabels: Advanced Servers, DNS Servers, Ubuntu
How to install an Apache Server on ubuntu machine(A debian system)?
Step1 : Check if the package is installed or not
#dpkg -l | grep apache
This dpkg -l command is similar to rpm -qa command in Redhat linux to list all the applications installed in your system.
Step2 : Install the package if you did not get any output
#apt-get install apache*
Step3 : Now start the apache service
#service apache2 restart
Step2 : Install the package if you did not get any output
#apt-get install apache*
Step3 : Now start the apache service
#service apache2 restart
Step4 : On the service at booting time
#chkconfig apache2 on
Step5 : Check if the web server is running or not by accessing local host
#elinks localhost
Or
#chkconfig apache2 on
Step5 : Check if the web server is running or not by accessing local host
#elinks localhost
Or
Access localhost from browser
Here is the screen shot showing the test web page when apache is installed
Here is the screen shot showing the test web page when apache is installed
Apache Server Installation On Redhat Linux
0 commentsLabels: Advanced Servers, Apache Server, DNS Servers
How we can install Apache web server on Redhat linux?
Ans : The simplest way to install Apache on redhat machine is to use yum command.
Follow below steps :
To install and check if the web server is running with default test page.
Step1: Check if the package is installed or not
#rpm -qa | grep httpd
Step2 : Install the package if you did not get any output
#yum install httpd
Step3 : Now start the apache service
#service httpd restart
Step4 : On the service at booting time
#chkconfig httpd on
Step5 : Check if the web server is running or not by accessing local host
#elinks localhost
or
Access localhost from browser
When you access the server through browser red-hat Linux will present you with a test page as shown below

Many How to's Related To Apache Web Server Is Going To Come On linuxnix.com
1 commentsLabels: Advanced Servers, Apache, Basic-Servers, Servers, Web Servers
Hi all,
From today on words we are planing to provide in depth knowledge base on many Howto's related to Apache web server. Some of the howto's which we are going to present are as follows.

2. Apache installation[Redhat/Debian]
3. Apache installation through source
4. Apache ip based web access
5. Apache host based web access
5a.Hosting multiple SSL websites on single host
6. Apache authentication based web access
7. Apache SSL based web access
8. Apache integration with AD(Active Directory) authentication
7. Apache SSL based web access
8. Apache integration with AD(Active Directory) authentication
9. Apache log monitoring
10.Apache web server security
11.Troubleshooting apache
12.Apache fine tuning
12.Apache fine tuning
And many more to come.
For any queries please feel to comment on this or mail us at surendra@linuxnix.com and feel free to ask if we miss something to post about Apache web server. If you like our posts please refer our site to your friends and spread the knowledge.
How To Configure And Install Sendmail In Linux?
0 commentsLabels: How-To's, Mail Servers
Send mail is one of the old and widely used mail delivery agent/Mail system.
First Please check this link to know more about Mail Server
Configuration Of Sendmail :
1. All the sendmail configuration files are located at /etc/mail
2. Main configuration files are access, sendmail.mc and send mail.cf.
3. In this example my domain is example.com and my mail server host-name is mx.example.comStep1 : Install sendmail packages
Step4 : All the sendmail configuration files are stored in /etc/mail and now configure relay ip address list
#yum install sendmail*
#yum install m4
Step2 : Configure DNS entries in forward look-up zone file
#vi /path/to/your/forward/lookup/zone/file
mx1.example.com. IN MX 10 example.com.
Save the file and exit.
Step3 : Check for configuration errors and reload the DNS server
#named-checkzone example.com /path/to/your/forward/lookup/#service named reload
Why we require this relay list?
Ans : This is because to secure your sendmail not get spam. So what ever Network/host-names you specified in this access file those networks/host-names only get access to our sendmail.
#vi /etc/mail/access
Entries as follows.
192.168.0.0/24 RELAY
Save and exit the file
Step5 : Now update the file to sendmail database with makemap command
Note : After executing below command you will find access.db, this is the indication that your makemap command worked perfect and database have been updated successfully.
Note : So if you want to relay more networks you have to edit access file.
#makemap hash access < access Step6 : Configure sendmail.mc file
Step6(b) : Search for 127.0.0 line and comment that line if its not commented.
to
dnl
#vi /etc/mail/sendmail.mc
Step6(a) : Search for "confAUTH_OPTIONS" with out quotes open a new line after that and enter below entry in that line
define(`confDOMAIN_NAME', 'example.com')dnl
Caution : When using the quotes, "`" opening quote is near to escape key and "'" closing quote is at enter key.
dnl #DAEMON_OPTIONS(`Port=smtp,Addr=127.0.0.1, Name=MTA')dnl
Step6(c) : Search for LOCAL_DOMAINN with out quotes and modify the line as below from.
LOCAL_DOMAIN(`localhost.localdomain')dnl
LOCAL_DOMAIN(`mx.example.com')dnl
Step6(d) : Search for "MASQUERADE_AS" with out quotes and modify the line as below from..
dnl MASQUERADE_AS(`mydomain.com')to
MASQUERADE_AS(`example.com')dnl
Now save the file and exit
Step7 : Now compile sendmail.mc changes to reflect them in sendmail.cf
#m4 sendmail.mc > sendmail.cfStep8 : Now start/restart the sendmail service
#service sendmail restart Step9 : Now add the sendmail service to chkconfig list to start automatically at booting times
Step1 : Try sending mail using telnet command
#chkconfig sendmail on
Dovecot Configuration :
Step1 : Install the dovecot package
#yum install dovecotStep2 : Search for "protocols" in /etc/dovecot.conf file and replace with below mention line.
#vi /etc/dovecot.conf#protocols = imap imapsReplace this toprotocols = pop3 imap imaps
Step3 : Start the dovecot service.
#service dovecot restart
Step4 : Now add the dovecot service to chkconfig list to start automatically at booting times
#chkconfig dovecot onTesting the mail server
#telnet mx.example.com 25
Server responds with: 220 mx.example.com SMTP then type HELLO
HELLO
Now Server responds with: 250 OK now send MAIL FROM:root@example.com
Now Server responds with: 250 Address Ok. Now type
RCPT TO:user@example.com
RCPT TO:user@example.com
Now Server responds with: 250 user@example.com OK. now type DATA to enter mail content.
DATA
Now Server Responds (or may not): 354 Enter Mail
Enter message, then on a new line,.
exit
Now the message will be sent to user@example.com.
Now log-in to that user and try to see the mail.
#su user$mail
Here you can see your mail.As send mail configuration is huge and depends on the requirement. Here the configuration which I have shown you is basic configuration.
Q. What is the port number for SMTP?
Some FAQ's:
Ans : 25
Q. What is the port number for POP3, IMAP?
Ans : 110, 143
Q. What is present sendmail version?
Ans : 8
Q. What are other highly used mail servers in world?
Ans : qmail, exchange etcDo you want to find port numbers to other
protocols too?
Use google squared. My example is here
How To Upgrade An Installed Source Package?
0 commentsLabels: How-To's, Package-Mgmt
I have installed a package from source, now I want to upgrade the older version to new version which is available.
How can I upgrade already installed source package on my system?
Ans : This question arises to all the admins who do installation from source package. To upgrade a source package follow the same steps to you have did at the time of first installation through source. Package as shown below..
Step1: unpack the new source code in tmp directory.
#cd /tmp
#tar xvfz packagname.tar.gz
#cd packagename
#./configure –prefix=/path/to/old/installation
#make
#make check
#make install
Step2 : Now check what is the version if its updated to new version for example
If you install squid then execute below command
#squid -v
Troubleshooting Steps Of Tomcat Server
0 commentsLabels: Tomcat, Troubleshooting
Troubleshooting Steps to check whether the Tomcat server is runing or not?
Step1 : Check ps command output
#ps -ef | grep tomcat
Step2 : Check with nmap whether port 8080 is opened or not?
#nmap localhost
Step3 : Check with telnet command as shown in below by executing GET / HTTP/1.0 Host: localhost command once logged in to server at 8080 port.
#telnet localhost 8080 Trying 127.0.0.1... Connected to localhost.localdomain (127.0.0.1). Escape character is '^]'. GET / HTTP/1.0 Host: localhost
This command should output hte test tomcat page.
Enjoy the troubleshooting:)
How To Install Apache Tomcat on Linux(Redhat/Ubuntu)?
1 commentsLabels: Advanced Servers, How-To's
How to install Apache tomcat on Linux(Redhat/Ubuntu)?
What is Apache tomcat?
Ans : ApacheTomcat is an open source web application server which supports J2ee Servlets, JavaServer, Pages(JSP) and API's. Tomcat should not be confused with Apache web server which an HTTP web server.
---Wikipedia.
Some terminology about Apache tomcat.
Apache Tomcat can be configured by editing server.xml file. Those who knows apache web server. This server.xml can be taken as synonimas to httpd.conf file.
Servlet is defined as a way add dynamic content to a Web server using the Java platform. And a servlet container is a compiled, executable program. The servlet container name is tomcat is catalina.
Pre requists for Apache tomcat are
1. java
2. JDK
Step by step for installing Apache tomcat
Note : Avoide installing tomcat from reposatories, always prefer to install it from source downloaded from apache site.
Step1 : Install all the prequistes
Redhat :
#yum install java
Ubuntu :
#apt-get install java
Step2 : Download tomcat source package and uncompress it.
Redhat/Ubuntu
#cd /opt
#wget http://www.trieuvan.com/apache/tomcat/tomcat-6/v6.0.29/bin/apache-tomcat-6.0.29.tar.gz
#tar xvfz apache-tomcat-6.0.29.tar.gz
Step3 : Setup the paths for Catalina and others.
Setting catalina paths
Redhat/ubuntu
CATALINA_HOME=/opt/apache-tomcat-6.0.29
CATALINA_BASE=/opt/apache-tomcat-6.0.29
Setting java paths
Check what java versions are installed in your system
#update-alternatives --config java
This command will display which is default java version used by your machine.
Example output :
# update-alternatives --config java
There are 2 programs which provide 'java'.
Selection Command
-----------------------------------------------
1
/usr/lib/jvm/jre-1.4.2-gcj/bin/java
*+ 2
/usr/lib/jvm/jre-1.6.0-openjdk/bin/java
Enter to keep the current selection[+], or type selection number:
If you see above the default java version is 1.6 so set the path to /usr/lib/jvm/jre-1.6.0-openjdk
JAVA_HOME=/usr/lib/jvm/jre-1.6.0-openjdk
JDK_HOMe=$JAVA_HOME
Step4 : Now start tomcat server
#/opt/apache-tomcat-6.0.29/bin/sartup.sh
Sample output.
Using CATALINA_BASE: /opt/apache-tomcat-5.5.26
Using CATALINA_HOME: /opt/apache-tomcat-5.5.26
Using CATALINA_TMPDIR: /opt/apache-tomcat-5.5.26/temp
Using JRE_HOME:
/usr/lib/jvm/java-1.6.0-openjdk-1.6.0.0/
Step5 : By default Apache Tomcat will be hosted onlocalhost : 8080 port by default. So try to access the site with web browser
http://localhost:8080
or
http://localhost:8080
or
http://systemname:8080
Stay tuned to other posts about troubleshooting tomcat installation.
How To Set Java Path In Linux?
0 commentsLabels: How-To's
How to set java path in Linux?
Ans : Check where java is installed by using below command
#update-alternatives --config java
This command will show installed java packages in your machine.
Example output :
# update-alternatives --config java
There are 2 programs which provide 'java'.
Selection ----------------------------------------------- 1 /usr/lib/jvm/jre-1.4.2-gcj/bin/java *+ 2
From above you can see java version in use it. 1.6.
Setting java path(In Temporary way)
#JAVA_HOME=/usr/lib/jvm/jre-1.6.0-openjdk #export $JAVA_HOME
Setting java path (In Permanent way)
Edit ~/.bashrc and place below two lines in that file and save the file.
Vi ~/.bashrc
JAVA_HOME=/usr/lib/jvm/jre-1.6.0-openjdk export $JAVA_HOME
Now save the file and exit, then logout and login to make those changes to reflect.
Command
/usr/lib/jvm/jre-1.6.0-openjdk/bin/java
How to Set Priority for a service at booting of Linux
0 commentsLabels: Booting, Hacks
This is possible with renaming of the scripts located in running configuration(rc) folders. As you people know that
all the startup scripts are stored in rc1.d, rc2.d etc... each of these folders corresponding to scripts to be started in that run-level
for example.. if you want to start some script in runlevel 1 they are kept in /etc/rc1.d folder so that when Linux is booting up these scripts are executed at runlevel 1.
So how can i set priority to my scripts/services?
Just go in to one of the rc folders, you can see all the scripts which are started in that runlevel..
if you observe those scripts, these scripts will start with different numbers. here are some for your reference.
K09apache2
K15pulseaudio
K20acpi-support
K20kerneloops
K20saned
K20speech-dispatcher
K20virtualbox-ose
K20virtualbox-ose-guest-utils
K74bluetooth
README
S30killprocs
S70dns-clean
S70pppd-dns
S90single
so the script(services) start sequence will be like K09apache2 then K15pulseaudio so on.. so if you want to give priority to your service just name with less number.. as shown below..
K09apache2
K01pulseaudio
K20acpi-support
K20kerneloops
K20saned
K20speech-dispatcher
K20virtualbox-ose
K20virtualbox-ose-guest-utils
K74bluetooth
README
S30killprocs
S70dns-clean
S70pppd-dns
S90single
So now the first script/service which start in this list is K01pulseaudio
Please comment your thoughts on this..
How To Change The Java Version In Linux?
0 commentsLabels: How-To's
This post is regarding how to change java version if multiple java versions are installed?
Check what are the java versions are installed on your system
#java -version
Example output
OpenJDK Runtime Environment (build 1.6.0-b09)
OpenJDK Client VM (build 1.6.0-b09, mixed mode)
So now I want to change the one version to another version.
If more than one java is installed. Execute below command to see how many java versions are installed? And what is the default version (Default version will be indicated by *)
#update-alternatives --config java
This command will display which is default java version used by your machine..
Example output.
# update-alternatives --config java
There are 2 programs which provided 'java'.
Selection Command
-----------------------------------------------
1. /usr/lib/jvm/jre-1.4.2-gcj/bin/java
*+ 2 /usr/lib/jvm/jre-1.6.0-openjdk/bin/java
Enter to keep the current selection[+], or type selection number:
So if you want to change the java version from 1.6 (now 2 is default version as shown) to 1.4 just press “1” with out quotes.
Please let us know if you know other way of changing java version.
How To Enable Verbose Mode For SSH Logins?
0 commentsLabels: How-To's, SSH, Troubleshooting
How we can login to remote server through ssh?
#ssh user@servername
or
#ssh -l user servername
or
#ssh ip-add
So when you will execute the above command you will get the password prompt. But if you want to see what will happen when you execute ssh command you have to enable verbose or debugging mode. To do this we have to apply -v option at the time of login as shown in below example.
#ssh -v surendra@ftp2.linuxnix.com
root@krishna:/home/surendra# ssh -v surendra_a@ftp2.linuxnix.com
OpenSSH_5.5p1 Debian-4ubuntu4, OpenSSL 0.9.8o 01 Jun 2010
debug1: Reading configuration data /etc/ssh/ssh_config
debug1: Applying options for *
debug1: Connecting to ftp2.linuxnix.com [92.32.56.78] port 22.
debug1: Connection established.
debug1: permanently_set_uid: 0/0
debug1: identity file /root/.ssh/id_rsa type -1
debug1: identity file /root/.ssh/id_rsa-cert type -1
debug1: identity file /root/.ssh/id_dsa type -1
debug1: identity file /root/.ssh/id_dsa-cert type -1
debug1: Remote protocol version 1.99, remote software version OpenSSH_4.0
debug1: match: OpenSSH_4.0 pat OpenSSH_4*
debug1: Enabling compatibility mode for protocol 2.0
debug1: Local version string SSH-2.0-OpenSSH_5.5p1 Debian-4ubuntu4
debug1: SSH2_MSG_KEXINIT sent
debug1: SSH2_MSG_KEXINIT received
debug1: kex: server->client aes128-ctr hmac-md5 none
debug1: kex: client->server aes128-ctr hmac-md5 none
debug1: SSH2_MSG_KEX_DH_GEX_REQUEST(1024<1024<8192) sent
debug1: expecting SSH2_MSG_KEX_DH_GEX_GROUP
debug1: SSH2_MSG_KEX_DH_GEX_INIT sent
debug1: expecting SSH2_MSG_KEX_DH_GEX_REPLY
debug1: Host 'ftp2.linuxnix.com' is known and matches the RSA host key.
debug1: Found key in /root/.ssh/known_hosts:1
debug1: ssh_rsa_verify: signature correct
debug1: SSH2_MSG_NEWKEYS sent
debug1: expecting SSH2_MSG_NEWKEYS
debug1: SSH2_MSG_NEWKEYS received
debug1: Roaming not allowed by server
debug1: SSH2_MSG_SERVICE_REQUEST sent
debug1: SSH2_MSG_SERVICE_ACCEPT received
debug1: Authentications that can continue: publickey,password,keyboard-interactive
debug1: Next authentication method: publickey
debug1: Trying private key: /root/.ssh/id_rsa
debug1: Trying private key: /root/.ssh/id_dsa
debug1: Next authentication method: keyboard-interactive
debug1: Authentications that can continue: publickey,password,keyboard-interactive
debug1: Next authentication method: password
surendra_a@ftp2.linuxnix.com's password:
debug1: Authentication succeeded (password).
debug1: channel 0: new [client-session]
debug1: Entering interactive session.
debug1: Sending environment.
debug1: Sending env LANG = en_IN
Last login: Thu Dec 9 20:02:47 2010 from 1.23.6.79
After logout
debug1: client_input_channel_req: channel 0 rtype exit-status reply 0
debug1: channel 0: free: client-session, nchannels 1
Connection to ftp2.linuxnix.com closed.
Transferred: sent 2072, received 2072 bytes, in 27.7 seconds
Bytes per second: sent 74.8, received 74.8
debug1: Exit status 0
So if you want more verboseness you can use up to 3rd level(-vvv) as shown below
#ssh -vvv surendra_a@ftp2.linuxnix.com
NIC Bonding In Linux
2 commentsLabels: Administration, Advanced Servers, Network Troubleshooting
Nic bonding is defined as bonding of two or more network cards on a server/pc to form a parallel single connection. This is a great way of achieving redundancy to a server if its having more number of network cards. Its having many names like.
1. Link aggregation
2. Channel Bonding
3. NIC Bonding
4. NIC teaming
5. Network card Bonding
6. Ethernet bonding
7. Trunking
8. Etherchannel
9. Multi-link truning(MLT)
10.Network bonding
11.Network Fault Tolerance(NFT)
12.Port channel
13.Smartgroup
14.EtherTrunk
1. Link aggregation
2. Channel Bonding
3. NIC Bonding
4. NIC teaming
5. Network card Bonding
6. Ethernet bonding
7. Trunking
8. Etherchannel
9. Multi-link truning(MLT)
10.Network bonding
11.Network Fault Tolerance(NFT)
12.Port channel
13.Smartgroup
14.EtherTrunk
Nic bonding is used to provide two benefits for us
1. High bandwidth
2. Redundancy/resilience
Before Clustering softwares come in to existing this technique is widely used to provide redundancy to a high end server. After cluster software introduced its used to enhance the cluster redundancy.
In this post we will see how can we achieve Nic bonding.
Nic bonding will work with the help of bonding driver in kernel.
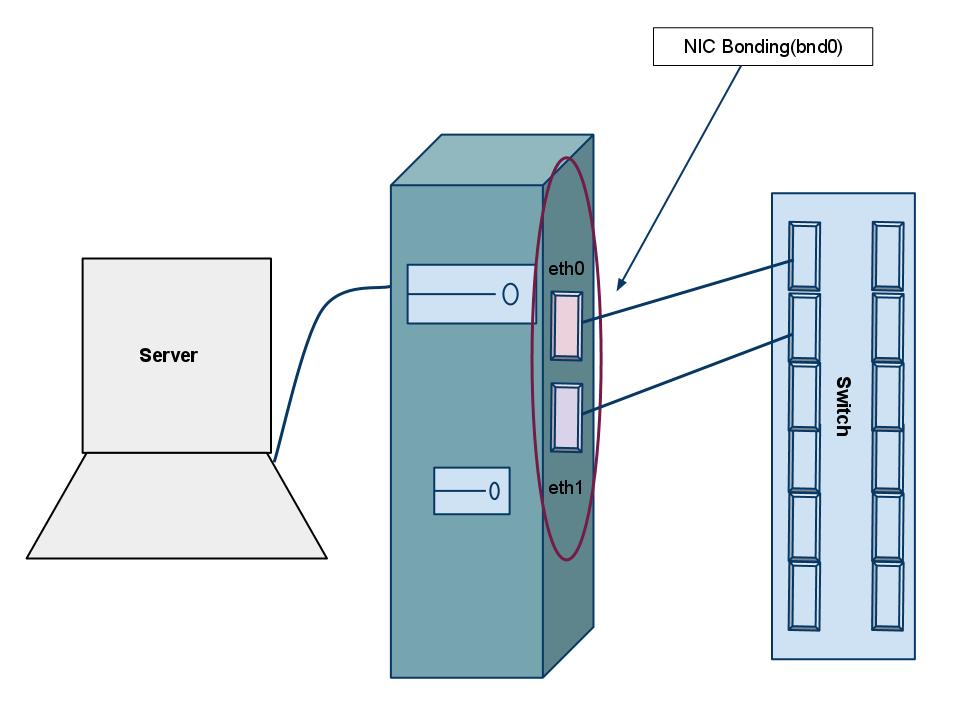
Implementing NIC bonding : Participating interfaces.
eth0
eth1
bnd0
Step1 : Create bond interface file with following content in it
vi /etc/syconfig/network-scripts/ifcfg-bnd0
DEVICE=bnd0
IPADDR=192.168.0.234
NETWORK=192.168.0.0
NETMASK=255.255.255.0
eth1
bnd0
Step1 : Create bond interface file with following content in it
vi /etc/syconfig/network-scripts/ifcfg-bnd0
DEVICE=bnd0
IPADDR=192.168.0.234
NETWORK=192.168.0.0
NETMASK=255.255.255.0
USERCTL=no
BOOTPROTO=none
ONBOOT=yes
GATEWAY=192.168.0.1
save and exit the file
Step2 : Now create a bnd0 virtual interface in modprobe.conf as shown below
alias bnd0 bonding
options bnd0 miimon=100 mode=6
Save and exit the file
Let me explain what actually the above two lines indicates
Line1 : (alias bnd0 bonding) to load the bonding module in to kernel
Line2 : Indicate the option for thie bond interface
miimon is nothing but to MONitor with MIItool to check the availability of other interfaces.
mode is to specify whether the bond is configured as load balancing or fail over. Here its load-balancing which means data transmission will be shared between two interfaces. To know more about modes click here
Step3 : Load the module in to kernel with modprob command to update this changes to kernel
#modprob bonding
Step4 : edit interface card details of both physical devices
For eth0
vi /etc/sysconfig/network-scripts/ifcfg-eth0
DEVICE=eth0
USERCTL=no
ONBOOT=yes
MASTER=bnd0
SLAVE=yes
BOOTPROTO=none
For eth1
vi /etc/sysconfig/network-scripts/ifcfg-eth1
DEVICE=eth1
USERCTL=no
ONBOOT=yes
MASTER=bnd0
SLAVE=yes
BOOTPROTO=none
Save and exit the files
The above thing is self explanatory for many admins but let me explain to new people.
DEVICE Indicates what is the device name
USERCTL Indicates that can user control this device(here its no)
ONBOOT Indicates that at the boot time do this device should be up?
MASTER Is this device has master? Then what it is(here its bnd0)
SLAVE Is this device acting as slave?
BOOTPROTO What about getting ip add from what protocol?(its set to none which indicate its a static IP)
Step5 : Restart the network service and see the output of ifconfig for your self.
#service network restart
#ifconfig
Questions & Answers
1. How can we say my data is flowing in which path?
Ans : Link aggregation(bonding driver) will take care of sending all the frames of particular session in same path. This is called as ordering of frames.
2. Can we bond more than 2 NIC?
Ans : Yes we can, follow the same procedure. In fact there is no limit but linux server do have limit to have total number of NIC cards.
Tips on implementing NIC bonding
1. Enable spanning tree for switches, with out which network speed reduces.
2. Be careful if you’re doing this over a remote ssh.
BOOTPROTO=none
ONBOOT=yes
GATEWAY=192.168.0.1
save and exit the file
Step2 : Now create a bnd0 virtual interface in modprobe.conf as shown below
alias bnd0 bonding
options bnd0 miimon=100 mode=6
Save and exit the file
Let me explain what actually the above two lines indicates
Line1 : (alias bnd0 bonding) to load the bonding module in to kernel
Line2 : Indicate the option for thie bond interface
miimon is nothing but to MONitor with MIItool to check the availability of other interfaces.
mode is to specify whether the bond is configured as load balancing or fail over. Here its load-balancing which means data transmission will be shared between two interfaces. To know more about modes click here
Step3 : Load the module in to kernel with modprob command to update this changes to kernel
#modprob bonding
Step4 : edit interface card details of both physical devices
For eth0
vi /etc/sysconfig/network-scripts/ifcfg-eth0
DEVICE=eth0
USERCTL=no
ONBOOT=yes
MASTER=bnd0
SLAVE=yes
BOOTPROTO=none
For eth1
vi /etc/sysconfig/network-scripts/ifcfg-eth1
DEVICE=eth1
USERCTL=no
ONBOOT=yes
MASTER=bnd0
SLAVE=yes
BOOTPROTO=none
Save and exit the files
The above thing is self explanatory for many admins but let me explain to new people.
DEVICE Indicates what is the device name
USERCTL Indicates that can user control this device(here its no)
ONBOOT Indicates that at the boot time do this device should be up?
MASTER Is this device has master? Then what it is(here its bnd0)
SLAVE Is this device acting as slave?
BOOTPROTO What about getting ip add from what protocol?(its set to none which indicate its a static IP)
Step5 : Restart the network service and see the output of ifconfig for your self.
#service network restart
#ifconfig
Questions & Answers
1. How can we say my data is flowing in which path?
Ans : Link aggregation(bonding driver) will take care of sending all the frames of particular session in same path. This is called as ordering of frames.
2. Can we bond more than 2 NIC?
Ans : Yes we can, follow the same procedure. In fact there is no limit but linux server do have limit to have total number of NIC cards.
Tips on implementing NIC bonding
1. Enable spanning tree for switches, with out which network speed reduces.
2. Be careful if you’re doing this over a remote ssh.
Failed To Make Swap Directory Cache (13) Permission Denied
2 commentsLabels: Proxy Servers
When installing squid as cache server you have to create cache folder with “squid -z” command with out quotes. But when you are trying this you will see
/usr/local/squid/sbin# ./squid -z
2010/04/29 22:39:16
Creating Swap Directories
FATAL : Failed to make swap directory /usr/local/squid/var/cache: (13) Permission denied
Squid Cache (Version 2.5.STABLE5) : Terminated abnormally.
CPU Usage : 0.000 seconds = 0.000 user + 0.000 sys
This is due to that /usr/local/squid/var/cache folder is not owned by effective user. To resolve this issue follow below steps
Step1 : Create squid user(A normal user) if the squid user is not there
#useradd squid
Step2 : Specify the effective user entry in squid.conf file with squid as username by editing it.
#vi /usr/local/squid/etc/squid.conf
change the entry from
# cache_effective_user nouser
to
cache_effective_user squid
Save the file now
Step3 : Now change the ownership of the cache folder to squid user
#chown -R squid.squid /usr/local/squid/var/cache
Step4 : Now create cache directory with squid -z command
#squid -z
Now you will be out of issue.
How To Change The Date In Linux?
0 commentsLabels: Basics, How-To's
How can we change the date/time in linux?
Ans : Changing date in linux is bit confusing. If you want to change date in GUI its very much easy and if you want to change it when it comes to CLI its bit hard to remember it.
Date is the command to check whats the present date
#date
To change the date use below command
#date MMDDHHMMYYYY.ss
MM => Two digit month value
DD => Two digit day value
HH => Two digit hour value
MM => Two digit minuite value
YYYY => Four digit year value
ss => Two digit seconds value(very rare we will be using this)
Example1 : I want to change the date to Nov 24 1:36 PM 2010
#date 112413362010
Example2 : I want to change the date to Jan 9th 8:05.04 AM 2010
#date 010908052010.04
Now the date will be changed to your required date.
Subscribe to:
Posts (Atom)


